Run a Camera Session From Prepared Media: Presets, Live Framing and the Floating Controller
How to record, go live, take photos and run demos with DRVCAM: set up Main and two presets, frame your media, and steer everything from the floating controller without leaving the app.
Table of Contents
The first time you see your own clip playing in another app's camera, it feels like magic. The second time, you want control: a different scene for the intro, a closer framing for the product, a switch to the real camera for a live moment. This guide shows how to set DRVCAM up like a small broadcast desk you carry in your pocket.
What you can do with it
- Record videos: start recording in a camera or social app and it captures your prepared clip, while your real microphone records your voice.
- Go live: stream a looping intro, a demo or a still, and cut between presets during the stream.
- Take photos: photo sessions in supported apps capture your selected image, framed the way you set it.
- Video calls: show a prepared clip or image, and flip back to the real camera without hanging up.
- Demos and presentations: walk through prepared media with speed, loop and seek under your thumb.
Step 1: Build your library
Open Library → Media and import your clips and images. You can select several files at once. Nothing goes on camera yet; importing only adds files to your library.
Step 2: Set up Main and two presets
Open Library → Presets. You have three slots:
- Main Media: your default scene.
- Preset 1 and Preset 2: extra scenes you can jump to.
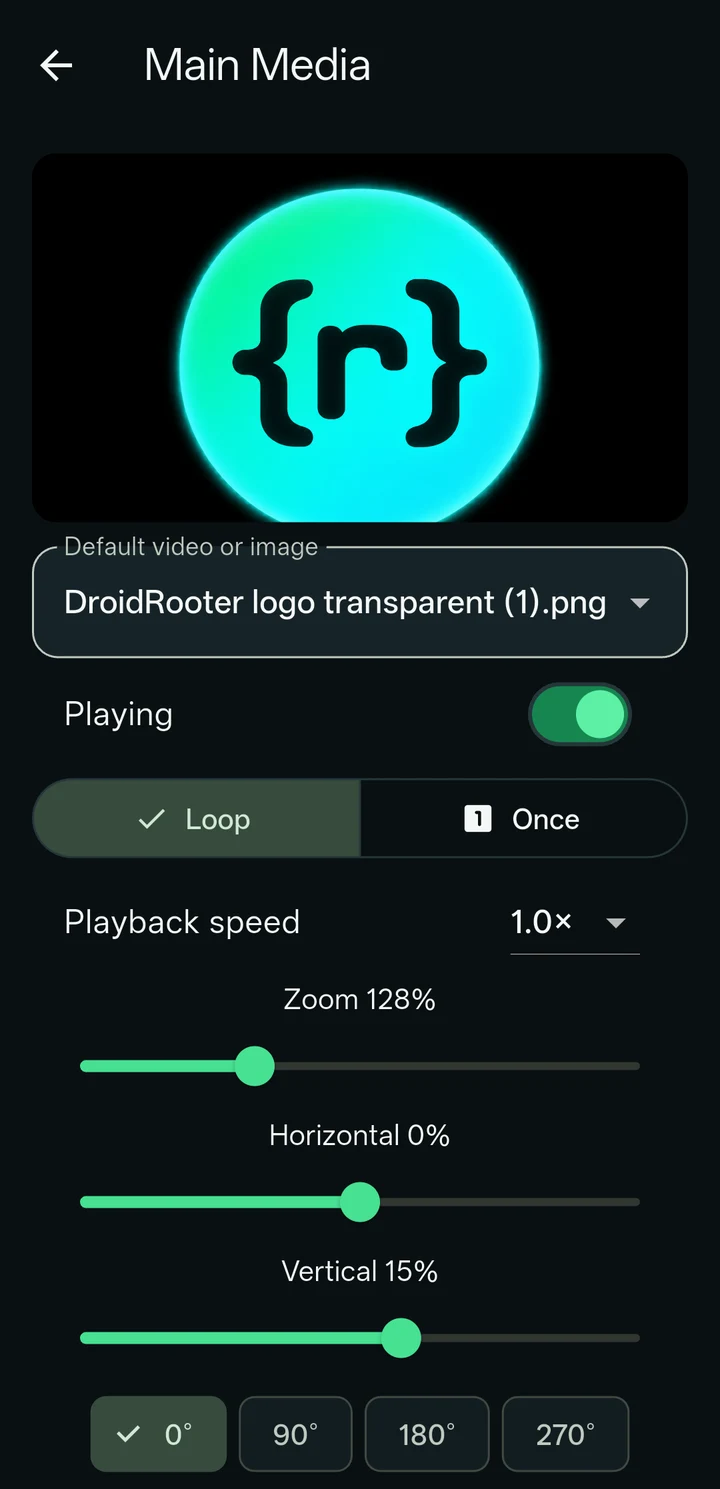
Open a slot, choose its media, and set how it should look and play:
- Playing, Loop or Once, and playback speed from 0.5× to 2×.
- Zoom, Horizontal and Vertical position.
- Rotation in 90° steps and Mirror horizontally.
Tap Save complete preset. Each preset stores all of these together, so switching presets swaps the whole look at once.
Step 3: Frame your media
Camera views come in different shapes. In the Media tab, use Frame media to choose camera fill or a fixed aspect ratio: 4:3, 16:9, 9:16 or 1:1. Framing never edits your original file, so you can reframe the same clip differently in each preset.
Step 4: Turn on the floating controller
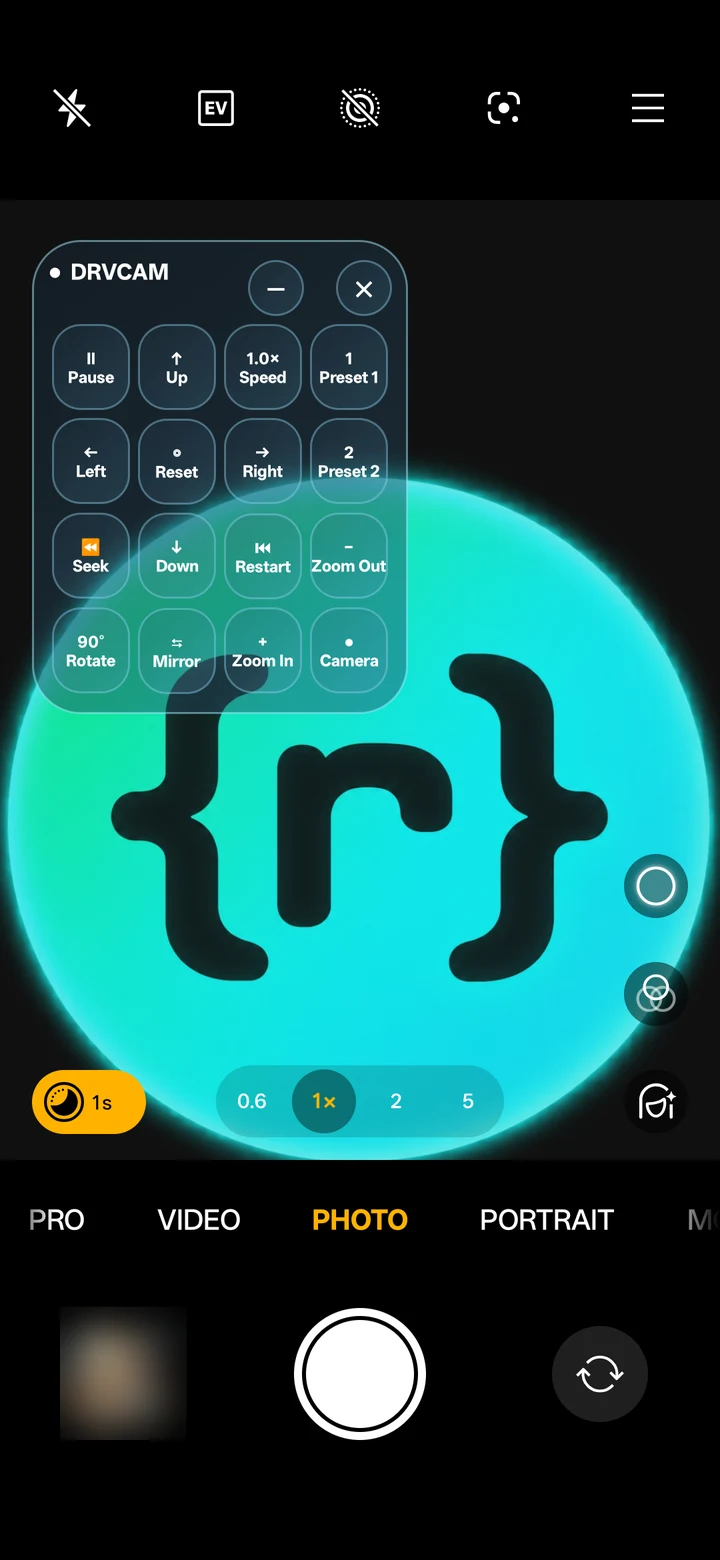
On Home, switch on Floating Controller and allow Display over other apps when asked. A small DRVCAM bubble now stays above whatever app you open. Expand it for the full panel:
- Play, pause, seek and restart.
- Pan up, down, left and right, and zoom in or out.
- Change speed, rotate and mirror.
- Load Preset 1 or Preset 2, or reset.
- Switch between your virtual feed and the real camera.
Minimise it to a small bubble when you need the screen, or drag it out of the way.
Step 5: Run the session
- Pick your target apps on Home and tap Enable.
- Open the target app and start recording, streaming or calling.
- Use the floating controller to cut between scenes as you go.
Tips for smooth sessions
- Test your presets in the target app before going live, so you know exactly how each one looks there.
- Match your clip's orientation to the camera view: portrait clips for portrait streams.
- Very high-resolution clips can be heavy on older phones; a 1080p source is plenty for most apps.
DRVCAM is a tool. You are solely responsible for how you use it, and DroidRooter is not responsible for any illegal use.
Frequently Asked Questions
How many presets does DRVCAM have?
Three slots: Main Media plus Preset 1 and Preset 2. Each stores its media, playback, loop, speed, pan, zoom, rotation, mirror and framing.
Can I control DRVCAM without leaving the app I am recording in?
Yes. The floating controller stays above the target app and gives you playback, pan, zoom, speed, presets, rotation, mirror and the real-camera switch.
Can I go live with DRVCAM?
In supported apps, yes. When the app streams, its camera shows your DRVCAM source, and your real microphone keeps working.
Does framing change my original video?
No. Framing is non-destructive, so the same file can be framed differently in each preset.
More on DRVCAM
Introducing DRVCAM: A Virtual Camera for Rooted Android 9–16
DRVCAM turns your own videos and photos into the camera feed of the apps you choose, with live presets, framing and a floating controller. Here is what it does and who it is for.
Read More →
How to Install DRVCAM on Rooted Android (Magisk, KernelSU or APatch)
A step-by-step DRVCAM setup: choosing the right build, enabling Zygisk and an Xposed framework, granting root, signing in and enabling your first target app.
Read More →
Best Virtual Camera Apps for Android in 2026: What Still Works
We looked at the virtual camera options Android users actually find, from open-source Xposed modules to Play Store apps and phone-as-webcam tools, and checked which ones are still maintained.
Read More →